Getting Started
MechitCalc is built around a simple workflow: select your calculation type, enter your inputs, calculate, and review results. Every calculator follows the same two-column layout so once you learn one, you know them all.
The Two-Column Layout
Every calculator page is split into two columns (stacked on mobile).
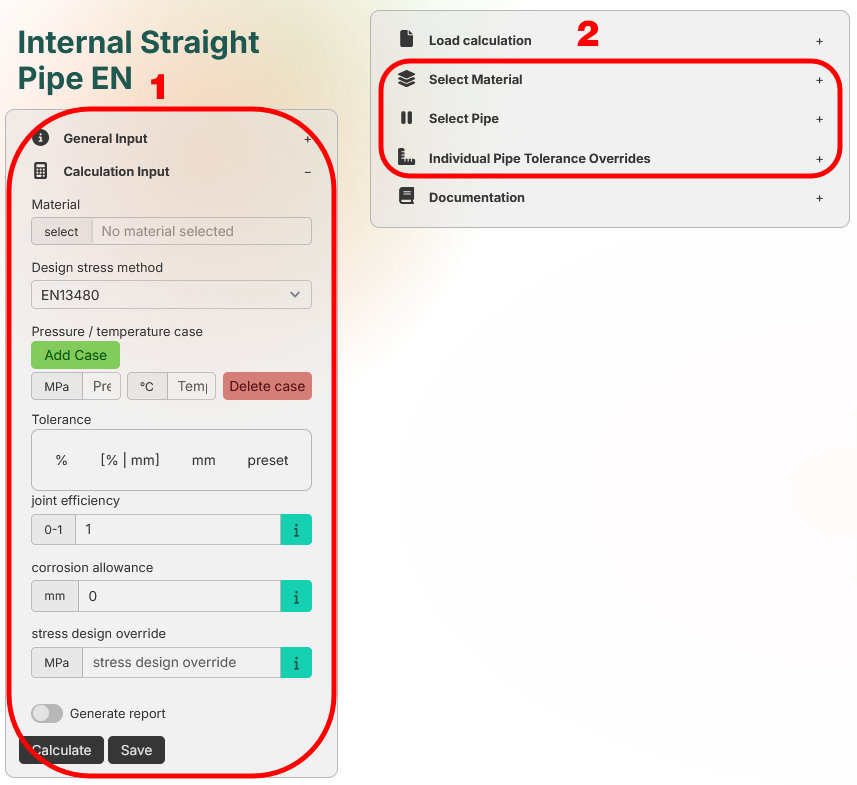
Left Column - Your Inputs
The left side contains two accordion sections:
General Input
These fields end up in the final report and identify the calculation:
These are purely informational - they don’t affect the calculation itself but appear on every generated PDF report.
Calculation Input
This is where the engineering happens. Typical fields include:
- Pressure / temperature cases - define one or more design condition rows. Each row is a pressure–temperature pair that gets evaluated independently. The order here is the order in the report.
- Joint efficiency - weld joint factor (ASME “E” or EN “z”) based on examination level.
- Corrosion allowance - experience-based material loss deduction (mm).
- Tolerance - fabrication wall-thickness tolerance. Multiple modes are available: percentage, absolute mm, combined, or preset standards (ISO 1127, EN 10216, etc.)
Some fields are optional overrides. For example Design stress - if left empty the program calculates it automatically from the selected material, temperature and code. If you fill it in, your value is used instead and marked as an override in the report.
The calculation-specific fields (bend radius, branch dimensions, head geometry, etc.) vary per calculator and are explained in the inline documentation on each calculator page.
Right Column - Lookups & Selections
The right side contains:
Saved Calculations
At the top you can load a previously saved calculation to continue editing or review old results.
Material Picker
Search the material database (3 000+ materials from EN & ASME codes). When you select a material, the program automatically looks up the correct design stress for each temperature case you defined.
1. You can search for parts of the material name in the search field and press [enter] or press the button to search. These can be seperate parts of a name.
2. You select a material by clicking on the row. It will also show up on the top
3. Show full descriptions shows more detailed parts of the description to help choose a material.

Pipe / Component Selection
Below the material picker you’ll find component-specific selectors depending on the calculator:
| Calculator type | Available selectors |
|---|---|
| Straight pipe | Pipe size selector |
| Pipe bend | Pipe size + bend radius selector |
| Branch connection | Header pipe + branch pipe selectors |
| Head | Pipe size selector |
| External pressure | Pipe size selector |
You can select multiple pipe sizes at once. the calculation will evaluate every size × every pressure/temperature case combination in a single run.
1. The Pipe selector has buttons for schedules, these allow you to only show those schedules to make selection easier.
2. The switch for Inch allows you to see the Inch in the left column or pipe diameter in mm.
3. The Add custom pipe button allows you to define your own custom pipe sizes.
4. Selecting a pipe is as easy as clicking the schedule button. It will show a different color to those selected.

Inline Documentation
The right column also has a Documentation accordion that explains every input field for that specific calculator, including the effect each parameter has on the result.
Running a Calculation
Once your inputs are filled in:
- Click the Calculate button at the bottom of the left column.
- The application sends all inputs to the calculation engine.
- Results appear below both columns in a full-width results area.
Understanding the Results
Results are organized into tabs:

Case Tabs
Each pressure/temperature case gets its own tab. Inside each tab you’ll find a summary table showing, for every selected pipe size:
- Required wall thickness
- Available wall thickness (after tolerance and corrosion deductions)
- Utilization ratio
- Pass / fail status
- Key intermediate values
The compact table lets you compare many sizes and cases at a glance.

Documentation Tab
Switch to the Documentation tab to see the full calculation breakdown:
- Step-by-step formulas rendered in proper mathematical layout (fractions, exponents, grouping) — not linear text strings.
- Numeric substitution for every formula so you can verify each value.
- All intermediate variables with their resolved values and the code clause that produced them.
This is the same level of detail that goes into the verbose PDF report.

Failed Tab
If any case or size fails validation (temperature out of range, missing data, etc.) it appears on a separate Failed tab with a description of what went wrong. In this case the corrosion allowance is larger than the thickness of the pipe.

Saving & Loading
- Save: after calculating, click Save in the left column. The calculation (inputs + results) is stored under your account.
- Load: on any calculator page, open the Saved Calculations accordion on the right and select a previous calculation. All inputs are restored so you can recalculate or edit.
- Manage: go to the Manage page (under Utilities in the navigation) to see all your saved calculations across every calculator type, rename them, or delete them.

Generating Reports
Toggle the Report switch in the left column before or after calculating.
One PDF output style is available:
| Style | Content |
|---|---|
| Combined | A single calculation gets shown in a verbose view with all the steps. and a compact table is created for all the other iterations. |
The report includes the General Input fields (project name, client, revision, etc.) as a cover/header so each PDF is a self-contained document.
Override Fields
Several inputs are optional overrides that let you deviate from the automatic code calculation when engineering judgement requires it:
- Design stress override — enter a custom allowable stress instead of the code-calculated value. Useful for class society rules (DNV, Lloyd’s, BV) where the safety factor differs from the base code.
- Joint efficiency override — override the weld joint factor for specific examination scenarios.
When an override is active it is clearly flagged in both the on-screen results and the PDF report so reviewers know which values were manually set.
Tip: leave override fields empty to use the automatic code values. Only fill them in when you have a specific reason.
Quick Reference
| Action | Where |
|---|---|
| Choose a calculator | Navigation bar → Calculators dropdown |
| Enter project info | Left column → General Input |
| Set design cases | Left column → Calculation Input → Pressure / temperature cases |
| Pick a material | Right column → Material Picker |
| Select pipe sizes | Right column → Pipe / Component selector |
| Run the calculation | Left column → Calculate button |
| View results per case | Results area → Case tabs |
| See full formulas | Results area → Documentation tab |
| Save your work | Left column → Save button |
| Load a saved calc | Right column → Saved Calculations |
| Generate PDF | Left column → Report toggle |
| Manage all calcs | Navigation bar → Utilities → Manage |